What I appreciate about "Two Wrongs Make Us Right"
- patrickmoates
- May 10, 2021
- 6 min read
Updated: Oct 30, 2022
This is a breakdown of a mission I really appreciated from a level design point of view in Cyberpunk 2077(CD PROJEKT RED). I had nothing, absolutely nothing, to do with its creation. I’m just admiring its design well after the fact. This isn’t going to be my only level appreciation post. I'll be analyzing the designs of other games, levels in future instalments.
Let’s talk about my favorite gig in Cyberpunk so far, “Two wrongs make us right.”
The quest metrics: The player is tasked with retrieving a vehicle. They must locate the vehicle (a proximity trigger), they must enter the vehicle (a player action), And they must drive it away and into what looks like a trigger volume. In order to do this, the player will have to ensure the vehicle isn’t destroyed.
Here is what I like about this gig in list format. I'll expand on each point further down.
Verticality of the map offers a vantage point and invites the player to plan their approach (See Molecule Diagram).
Enemy placement operates well as enemies-as-obstacles/puzzles.
Cool down areas for players attempting a stealth approach or for fun navigation.
Visual Design.
Verticality
This level has a high level of verticality, benefits from A.I. and “cliff” blinds that allow the player to observe and tag enemies. To abstract it this mission is a giant prospect space surrounded by shelfs and obstacles that form more intimate and closer spaces. Very basically this depression or hole has three tiers, a back area and a ramp. The bottom level, the most open space is subdivided by AI blinds, rectilinear clutter and cover.

The bottom level features the quests' objective, the vehicle, but also features the densest population of hostile NPCs. Because this map is in form, a pit, the player has site lines to large amounts of every floor from the surface. You can see a molecule diagram I put together to illustrate the spatial and sight relationships below.

You can also see from the diagram that there is more than one way to reach the bottom area with the objective (putting aside bounding down the hole directly with a specialized or hardy character build). Playing this from where you've likely triggered the quest, you'll probably approach this quest from the precipice of the pit. Players who have a high penchant for exploration may find the map’s other entrance, and its only viable exit ramp for the vehicle. Assuming you come at it from the edge of the pit the player is invited to plan an approach and is confronted by a set of choices that the AI below offer.
Enemy Placement As Obstacles
I’ve long thought of combat in games as a kind of contextual puzzle. In an RPG like Cyberpunk that enjoys rich mechanical player customization, the moment-to-moment choices of a shooter expand into myriad approaches, styles that interact with the game’s encounters. It’s like an RPG simulation shooter at times. For the point of this break down we’ll keep this analysis basic.
Let's consider a path. We’ll call it route 1. You descended a stairwell and arrive at a landing on the second level. On the way down you can see an enemy talking on the phone, and not terribly alert. This enemy is standing on the landing to another set of stairs leading from this level down to the bottom level and closer to the quest's objective. Also on this level, a little further past the stair well, are three enemies arranged around a television in a way that could make it possible-- if perhaps not easy--to get past without starting a fire fight.


Neutralizing this single, isolated enemy represents a lower cost in terms of risk. We’ll call this Option 1. There is a place to dispose of the body nearby, mitigating risk of discovery and further incentivizing this choice. The player will be tempted to incapacitate this first enemy and proceed deeper down the obvious path without fussing with the more robust encounter on that level. Attempting to bypass or neutralize the three enemies around the television is Option 2.

It’s a risk reward calculation. However, past the three enemies of Option 2, is a ladder. The ladder deposits the player in a back area on the bottom level, very close to their objective, and behind virtually every single enemy encounter. At the bottom of Option 2’s Shortcut, a single enemy in your immediate area is placed between you and the vehicle.
The mission's objective is around the corner and on the other side of a useful choke-point.

If the player dared to take the stealth approach, or explore their options they’re rewarded with a stronger position than if they had just gone down the stairwell, where two enemies and a turret wait.
With Choice 2, the player took a higher risk and was rewarded. However, this being a shooter with simulation aspects I wouldn’t call Choice 2 the golden choice. Having arrived in this more controllable, objective-adjacent back space, the player is still confronted with more choices. There are guards near the vehicle. There are enemies deeper into the bottom levels open prospect space that threaten the vehicle. One enemy turret down in the prospect space, and one similarly heavy hitting turret on the far end of the maps exit ramp could chew threw the vehicle’s health. The player can certainly hop in the car and gun it. It would even be thrilling, but they’d miss out on exploring the map and risk failing the gig with a destroyed objective.
Had the player gone with choice one there are loads of cool-off spaces among the scaffolding that make up the stairs down and cargo containers that readily serve as an AI blind from which to make choices. Going down the obvious path doesn't need to lead to immediate combat and this path, too, can facilitate thoughtful, deliberate play. Those same turrets that pose a problem for a quick exit in choice 2 could be hacked or ripped from their mounts as a weapon against the other enemy AI on this level. The player could go for a more guns-blazing, action movie approach.

Ultimately, it’s the player’s choice. The way that this level presents these choices so unobtrusively with good sight lines and clever enemy placement and can accommodate the games wide variety of approaches speaks to the levels design.
Cool Down Areas
As I said above, Cargo containers, scaffolding, rectilinearly placed crates and clutter on the bottom levels prospect space, allow the player to make choices out of sight of the enemy. They also create paths, and direct flow of enemy AI, and afford the player more fun choice on how they want to navigate through the level. They allow for regrouping. You can cut through the cargo container, moving out of site from enemies near the tunnel, or leap on top of it to ambush enemies near the vehicle from above?

The rectilinearly placed crates and debris help the space feel like a more natural space and provide cover.

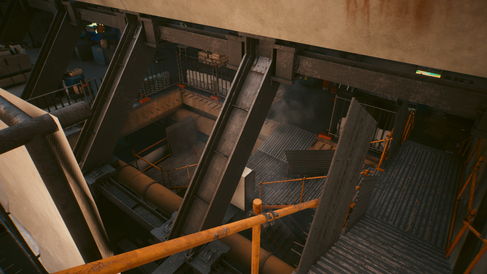
Visual Design
Linear elements and contrasts of materials, and lighting draw the players eyes down the length of the space. Pipes, girders reinforce the flow of the space.

The pillars here create an implied space, and also serve to draw the player's eye.

The level also tells a story with a visual clutter. This looks like a space the animals occupied.

So, that's what makes this level one of my favorites form a design stand point. Two wrongs make us right is (as of this writing) the only fixer assigned mission, in Pacifica. This makes its placement interesting from a world design point of view. Some may feel that it’s too close to the district’s ripperdoc and clothing shop. I’ve also experienced the phone call trigger/event interrupting my pursuit of fresh clothes. That being said, there are certainly other consideration that I can see dictating this mission’s and its trigger’s placement.
There is sprawling main story quest, that occupies a lot of square footage, and a Delimain related chase quest. During either of the aforementioned quests it would be distracting to have Mr. Hands, the district’s fixer call. It’s my thinking that the designers had to be careful about where they put the quests trigger. I’d like to know more about what went into its placement but the vendors, and other, non-main quest related content consigned to a “safe distance” from the main quest, I suspect that it makes sense to place this gig near a spot, like the aforementioned vendors, to increase the odds that the player would run into its triggering radius.
Feel free to post your thoughts on this or your favorite levels below.
Comments